|


 Facebook#1(調査)
| 外部サイト |
|
|

HOME > UNNotificationRequest (iOS10以降)
UNNotificationRequest
UNNotificationRequestでローカル通知を行います。 iPhone端末上で時刻日付が管理され通知してくれます。※iOS10以前はUILocalNotificationを使っていましたが、iOS10以降は このクラスを利用してローカルノーティティフェーションを実行することになります。
UNNotificationRequestのクラス階層
NSObject
↑
UNNotificationRequest
参考Appleサイト(英語):
参考:UNNotificationRequest
参考:Using UNUserNotificationCenter to support iOS 10 rich notifications, but the notification never shows up. It only sounds the alert
参考:[iOS 10] User Notifications framework を使用して時限式のローカル通知を作成する #wwdc
参考:【iOS10】UNNotificationのstateと通知の削除
参考:Swift 3.0 Syntax change for UIUserNotificationSettings
参考:
参考:[iOS 10] User Notifications framework を使用して指定日時に発火するローカル通知を作成する #wwdc
参考:Local Notifications with iOS 10
Notificationを登録する、受け取る。
import UserNotifications
import NotificationCenter
class AppDelegate: UIResponder, UIApplicationDelegate, UNUserNotificationCenterDelegate {
....
//ApDelegate.swifの起動時に呼ばれる関数
func application(_ application: UIApplication, didFinishLaunchingWithOptions launchOptions: [UIApplicationLaunchOptionsKey: Any]?) -> Bool {
//Notification登録前のおまじない。テストの為、現在のノーティフケーションを削除します
UNUserNotificationCenter.current().removeAllPendingNotificationRequests();
//Notification登録前のおまじない。これがないとpermissionエラーが発生するので必要です。
UNUserNotificationCenter.current().requestAuthorization(options:[.badge, .alert, .sound]) { (granted, error) in if granted {print("通知許可")}
}
//以下で登録処理
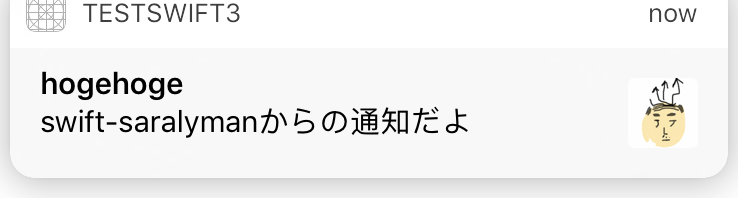
let content = UNMutableNotificationContent()
content.title = "hogehoge";
content.body = "swift-saralymanからの通知だよ";
content.sound = UNNotificationSound.default()
let trigger = UNTimeIntervalNotificationTrigger.init(timeInterval: 5, repeats: false)//5秒後
let request = UNNotificationRequest.init(identifier: "TestNotification", content: content, trigger: trigger)
let center = UNUserNotificationCenter.current()
center.add(request)
center.delegate = self
return true
}
//上記のNotificatioを5秒後に受け取る関数
//ポップアップ表示のタイミングで呼ばれる関数
//(アプリがアクティブ、非アクテイブ、アプリ未起動,バックグラウンドでも呼ばれる)
func userNotificationCenter(_ center: UNUserNotificationCenter,
willPresent notification: UNNotification,
withCompletionHandler completionHandler: @escaping (UNNotificationPresentationOptions) -> Void) {
completionHandler([.alert,.sound])
}
//ポップアップ押した後に呼ばれる関数(↑の関数が呼ばれた後に呼ばれる)
func userNotificationCenter(_ center: UNUserNotificationCenter,
didReceive response: UNNotificationResponse,
withCompletionHandler completionHandler: @escaping () -> Void) {
//Alertダイアログでテスト表示
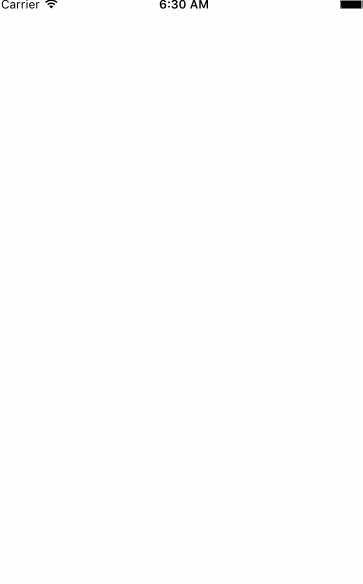
let contentBody = response.notification.request.content.body
let alert:UIAlertController = UIAlertController(title: "受け取りました", message: contentBody, preferredStyle: UIAlertControllerStyle.alert)
alert.addAction(UIAlertAction(title: "OK", style: UIAlertActionStyle.default, handler: {
(action:UIAlertAction!) -> Void in
print("Alert押されました")
}))
self.window?.rootViewController?.present(alert, animated: true, completion: nil)
completionHandler()
}
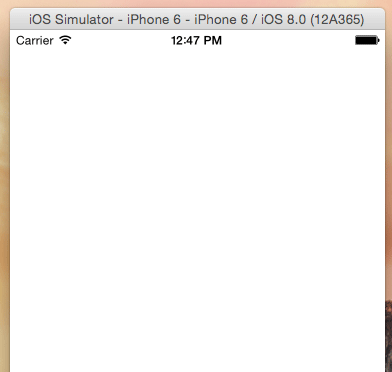
上記をAppDelegate.swftに貼り付けていただければ5秒後に以下ポップアップが表示されます。UserNotificationとNotificationCenterのimportはios10以前のNotificationはUIKitに 含まれていて不要でしたので 忘れがちかもしれませんのでご注意下さい。
上記はアプリがアクテイブ、非アクティブ、起動時バックグラウンド、非起動時、全て同じところに飛んできます。UILocalNotificationのイベント管理にくらべるとかなり 楽になった印象です
毎日同じ時間に通知を出す方法(毎朝8時に実行)
        //以下で登録処理
        let content = UNMutableNotificationContent()
        content.title = "hogehoge";
        content.body = "swift-saralymanからの通知だよ";
        content.sound = UNNotificationSound.default()
        let date = DateComponents(hour:8)//(month:7, day:7, hour:12, minute:0)
        let trigger = UNCalendarNotificationTrigger.init(dateMatching: date, repeats: true)//1回だけならrepeatsをfalseに
        let request = UNNotificationRequest.init(identifier: "TestNotification", content: content, trigger: trigger)
        let center = UNUserNotificationCenter.current()
        center.add(request)
        center.delegate = self
triggerにUNCalendarNotificationTriggerを利用します。DataComponets作成時に詳しい時間をセットしてTriggerにセット。 Triggerのrepeat変数に毎回実行するか、一回だけ実行かをセットします。
スケジュールをセットすると以前のUILocalnotificationではログが出ていましたが、UNNotificationRequestでは でないようです。代わりに次に実行される時間帯を取得するnextTriggerDateという関数がtriggerについていて、以下のログを確認 することができます。
        let nextTriggerDate = trigger.nextTriggerDate();
        print(nextTriggerDate)// Optional(2017-02-02 23:00:00 +0000) ※日本時間 8にセットしている状態
応用:毎月同じ日の同じ時間に通知を出す方法(3日の毎朝8時に実行)
        //以下で登録処理
        let content = UNMutableNotificationContent()
        content.title = "hogehoge";
        content.body = "swift-saralymanからの通知だよ";
        content.sound = UNNotificationSound.default()
        let date = DateComponents(day:3, hour:8, minute:0)
        let trigger = UNCalendarNotificationTrigger.init(dateMatching: date, repeats: true)
        let request = UNNotificationRequest.init(identifier: "TestNotification", content: content, trigger: trigger)
        let center = UNUserNotificationCenter.current()
        center.add(request)
        center.delegate = self
注意!複数のtriggerを実行した場合は、identifierを違った値にしないと上書きされてしまいます。↑のソースであれば、 TestNotificationの値をそれぞれ違った値にセットしてください。私は少しハマりました。。。。
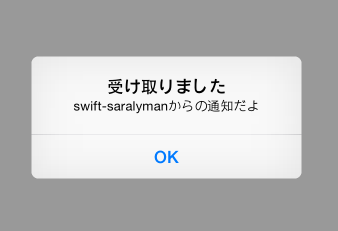
複雑な情報を送りたい場合はUserInfoを利用する
単純な文字列であればcontent.bodyを利用すれば良いですが、違う場合は以下のようにcontent.userInfoを利用します。 配列だったり、オブジェクトだったりを渡すことも可能です
        //以下で登録処理
        let content = UNMutableNotificationContent()
        content.title = "hogehoge";
        content.body = "swift-saralymanからの通知だよ";
        content.sound = UNNotificationSound.default()
        content.userInfo = ["url":"http://swift-salaryman.com"];
↓受け取る時もuserInfoを指定して受け取ります。
        //Alertダイアログでテスト表示
        let userInfo = response.notification.request.content.userInfo
        let alert:UIAlertController = UIAlertController(title: "受け取りました", message: userInfo["url"] as! String?, preferredStyle: UIAlertControllerStyle.alert)
        alert.addAction(UIAlertAction(title: "OK", style: UIAlertActionStyle.default, handler: {
            (action:UIAlertAction!) -> Void in
            print("Alert押されました")
        }))
        self.window?.rootViewController?.present(alert, animated: true, completion: nil)
こんな感じになります
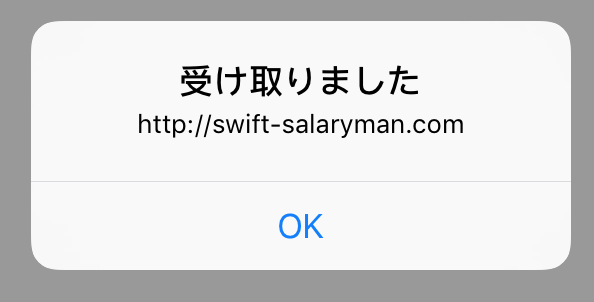
位置情報を元にした通知。
以前はバックグラウンドで常に位置を確認する必要がありスマートフォンの消費が激しくてつかいずらかったのですが、 ジオフェンス機能を利用すれば消費を抑えられるようです。そのジオフェンスの通知の方法です。UNLocationNotificationTriggerというトリガを利用します。
私が昔よく通っていた「大阪府スターバックス四ツ橋店(34.6719316,135.4924952)」に100m近づいたら実行されるデモ
参考:UNLocationNotificationTrigger
参考:iOSのジオフェンス機能 <=範囲の精度に関してわかりやすい!
	import CoreLocation

	...

	let coordinate = CLLocationCoordinate2DMake(34.6719316,135.4924952)//軽度緯度はGoogleMapから取得
	let region = CLCircularRegion(center: coordinate, radius: 100.0, identifier: "test")
	let trigger = UNLocationNotificationTrigger(region: region, repeats: false)
import CoreLocationを忘れずに
アタッチメント(画像や動画)を追加する
ローカル通知に画像や動画を追加することができます
参考:【iOS10】通知に画像や動画(アタッチメント)を付与する
        //以下で登録処理
        let content = UNMutableNotificationContent()
        content.title = "hogehoge";
        content.body = "swift-saralymanからの通知だよ";
        content.sound = UNNotificationSound.default()

        //プロジェクトに追加しているsalaryman.gifを読み込んでいる
        if let url = Bundle.main.url(forResource: "salaryman", withExtension: "gif"),
            let attachment = try? UNNotificationAttachment(identifier: "TestAttachment", url: url, options: nil){
            content.attachments = [attachment]
        }
まとめ
どんどん仕様が変わるので大変ですがSwift3になって使いやすくなってきていますね。
↓こんな記事もありますよ!
 2021-05-14 14:21:41 | WatchOSのwatchconnectivityのFiletransferの落とし穴。と、避け方。
AppleWatch 実機だと成功するんだけど、シュミレーターだと失敗するという、、、
昔作成してた時は成功してたのになーと思って調べると、どうやら昔は成功してたみたい。watchOS6以降は... |
 2021-05-06 14:04:37 | LINEのアニメーションスタンプ制作の落とし穴、、、失敗談
ゴールデンウィークにLINEスタンプを作成してみました。
作り切って申請も通したんですが、意図したアニメーションと違う、、、、
LINEクリエーターの画面だと、アニメーションのプレビュー... |
 2021-05-01 18:05:35 | 久しぶりのAdmobをobjective-cに実装。コンパイルエラーだらけ。バーミッション不具合でエミュレータにインスコできない。
忘れないようにメモ
エミュレータにアプリをインストールする際にパーミッション系のエラーがでた時、また、iphone実機にインストールする際にも権限系のエラーが出る場合。
ターゲット→ex... |
|
Tweet
|
|||
| |||