|


 Facebook#1(調査)
| 外部サイト |
|
|


HOME > UIAlertViewでポップアップ表示
UIAlertView(UIAlertController)でポップアップ表示
iOS8になってUIAlertViewがUIAlertControllerクラスになりました(厳密にはiOS8からはUIAlertControllerの使用が推奨されています。UIAlertViewも使えますが、推奨UIAlertControllerの説明を行います)。画面の上にポン!とダイアログ表示するメッセージアラートの説明です
UIAlertControllerのクラス階層
NSObject
↑
UIResponder
↑
UIViewController
↑
UIAlertController
参考:【iOS】【Swift】UIAlertControllerの基本的動作のまとめ
参考:iOS8でUIAlertViewはこうやってUIAlertControllerに置き換える
参考:UIKit Framework Reference UIAlertController Class Reference
やってみる
それではサンプルを実行させてみます。単純にAlertを出すだけの処理を実施してみます。以下のコードをViewControllerのviewDidLoadにセット。
let alert:UIAlertController = UIAlertController(title:"Swiftサラリーマン",
            message: "今朝ヒゲ剃るの忘れました",
            preferredStyle: UIAlertControllerStyle.Alert)
presentViewController(alert, animated: true, completion: nil)
実行すると、、、以下のエラーが発生しました
2015-01-22 07:23:26.592 test[530:9742] Warning: Attempt to present
UIAlertController: 0x7fdca2c9b360 on test.ViewController: 0x7fdca2c97f70
whose view is not in the window hierarchy!
ん、どうやらwindowの階層に追加されていない?ちょっとよくわかりません。presentViewControllerでViewが 追加されてるってことじゃないのかな。それとも親UIViewCotrollerが読み込み完了していないからでしょうか。
↓
こちらどうやら親ViewはvideDidLoadの時点ではwindow階層の中に含まれていない様です。viewDidLoadからviewDidAppearに 切り替えることで解決しました。改めて実行すると、無事以下のアラートが表示されました。
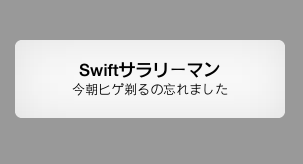
スタイルをActionSheetで表示してみる
UIAlertControllerの引数preferedStyleを切り替えると変更できます
let alert:UIAlertController = UIAlertController(title:"Swiftサラリーマン",
            message: "今朝ヒゲ剃るの忘れました",
            preferredStyle: UIAlertControllerStyle.ActionSheet)
presentViewController(alert, animated: true, completion: nil)
こんな風に画面下にひっそりグレイの色でメッセージが現れます。

ボタンを追加してみる
アラートボックスにCancelボタンを追加してみます
let alert:UIAlertController = UIAlertController(title:"Swiftサラリーマン",
            message: "今朝ヒゲ剃るの忘れました",
            preferredStyle: UIAlertControllerStyle.Alert)
presentViewController(alert, animated: true, completion: nil)


//キャンセルアクション
let cancelAction:UIAlertAction = UIAlertAction(title: "Cancel",
            style: UIAlertActionStyle.Cancel,
            handler:{
            (action:UIAlertAction!) -> Void in
                println("Cancel")
})
alert.addAction(cancelAction)


self.presentViewController(alert, animated: true, completion: nil)
実行すると、またもやエラー発生、、、、
2015-01-22 07:44:21.845 test[818:18820]
*** Terminating app due to uncaught exception 'NSInvalidArgumentException',
reason: 'Application tried to present modally an active controller test.ViewController: 0x7fde6bc5ff70.'
簡単に実装できると思っていたのですが、手間取っています。
↓
解決しましたが、、、、いまいちわかっていません。Stockoverflowの記事には、 tableViewCotrollerはnavigationViewControllerにembedされているからモーダルではなくPushを利用しなさいとの記載がありました。となると、、、おそらくUIViewCotrollerもnavigationViewControllerにembededされているのでしょうか? そうであればpushを利用できるー>できた、そんな状態です。。。。間違ったことを書いていましたらゴメンなさい。
解決方法はpreserntViewCotrolerではなくてpushViewCotrollerを利用する方法です
let alert:UIAlertController = UIAlertController(title:"Swiftサラリーマン",
            message: "今朝ヒゲ剃るの忘れました",
            preferredStyle: UIAlertControllerStyle.Alert)
presentViewController(alert, animated: true, completion: nil)

let cancelAction:UIAlertAction = UIAlertAction(title: "Cancel",
            style: UIAlertActionStyle.Cancel,
            handler:{
            (action:UIAlertAction!) -> Void in
                println("Cancel")
})
alert.addAction(cancelAction)

self.navigationController?.pushViewController(alert, animated: true)
できました!親のオブジェクト次第でモーダルにもできるはずですので調整してみてください
改めて、、、、再トライ:その他のボタンを追加してみる
キャンセルボタンだけでは物足りないので、その他のボタンも追加してみます。
        let alert:UIAlertController = UIAlertController(title:"Swiftサラリーマン",
            message: "今朝ヒゲ剃るの忘れました",
            preferredStyle: UIAlertControllerStyle.Alert)
        presentViewController(alert, animated: true, completion: nil)

        let cancelAction:UIAlertAction = UIAlertAction(title: "Cancel",
            style: UIAlertActionStyle.Cancel,
            handler:{
                (action:UIAlertAction!) -> Void in
                println("キャンセルボタンで一番下に表示されます")
        })

        let defaultAction:UIAlertAction = UIAlertAction(title: "通常ボタン",
            style: UIAlertActionStyle.Default,
            handler:{
                (action:UIAlertAction!) -> Void in
                println("一般的なボタン")
        })

        let destructiveAction:UIAlertAction = UIAlertAction(title: "削除ボタン",
            style: UIAlertActionStyle.Destructive,
            handler:{
                (action:UIAlertAction!) -> Void in
                println("削除や変動的な処理の場合に利用します")
        })


        alert.addAction(cancelAction)
        alert.addAction(defaultAction)
        alert.addAction(destructiveAction)

        self.navigationController?.pushViewController(alert, animated: true)
DefaultボタンとDestructiveボタンを追加しました。キャンセルボタンと加えてこの三パターンのボタンが存在します。キャンセルボタンは一つだけしか追加できません。 二つ追加すると落ちてしまいます。Defaultボタンは一般的なボタン。複数追加も可能です。Destructiveボタンは最初から文字が赤色になっています。削除や変更される可能性のあるボタンとして利用できます。
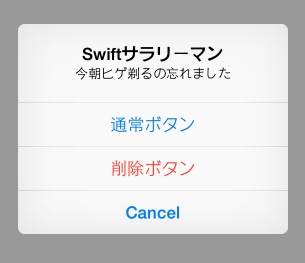
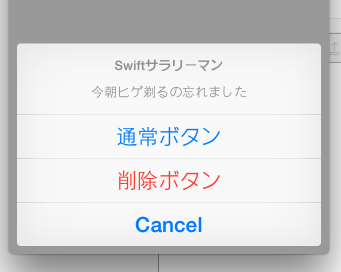
左がpreferedStyleがAlert、右はActionSheetです。
カスタマイズ
Alertはよく使うので簡単なOKとキャンセルのUtilityを作ってみました。突っ込みどころも多いかと思いますが、、、よかったらお使いください。
import UIKit

struct AlertUtl {
    // AlertUtl.ok(self, title: "タイトル", message: "完了しました", completion:{})
    static func ok(target:UIViewController,title:String,message:String,completion: (() -> Void)!)->Void{
        let alert:UIAlertController = UIAlertController(title:title,message:message,preferredStyle: UIAlertControllerStyle.Alert)
        let okAction:UIAlertAction = UIAlertAction(title: "OK",style: UIAlertActionStyle.Cancel,handler:{(action:UIAlertAction!) -> Void in completion()})
        alert.addAction(okAction)
        target.presentViewController(alert, animated: true, completion: nil)
    }
    static func cancel(target:UIViewController,title:String,message:String,completion: (() -> Void)!)->Void{
        let alert:UIAlertController = UIAlertController(title:title,message:message,preferredStyle: UIAlertControllerStyle.Alert)
        let cancelAction:UIAlertAction = UIAlertAction(title: "キャンセル",style: UIAlertActionStyle.Cancel,handler:{(action:UIAlertAction!) -> Void in completion()})
        alert.addAction(cancelAction)
        target.presentViewController(alert, animated: true, completion: nil)
    }
}
おまけ
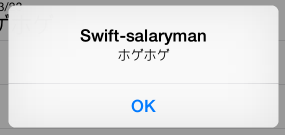
UIAlertViewControllerを使うべきといわれても、簡単に表示する確認する程度であれば以下のUIAlertViewを使うのがやっぱり簡単。(2015/3/24)
    let alert = UIAlertView()
    alert.title = "Swift-salaryman"
    alert.message = "ホゲホゲ"
    alert.addButtonWithTitle("OK")
    alert.show();
↓こんな記事もありますよ!
 2021-05-14 14:21:41 | WatchOSのwatchconnectivityのFiletransferの落とし穴。と、避け方。
AppleWatch 実機だと成功するんだけど、シュミレーターだと失敗するという、、、
昔作成してた時は成功してたのになーと思って調べると、どうやら昔は成功してたみたい。watchOS6以降は... |
 2021-05-06 14:04:37 | LINEのアニメーションスタンプ制作の落とし穴、、、失敗談
ゴールデンウィークにLINEスタンプを作成してみました。
作り切って申請も通したんですが、意図したアニメーションと違う、、、、
LINEクリエーターの画面だと、アニメーションのプレビュー... |
 2021-05-01 18:05:35 | 久しぶりのAdmobをobjective-cに実装。コンパイルエラーだらけ。バーミッション不具合でエミュレータにインスコできない。
忘れないようにメモ
エミュレータにアプリをインストールする際にパーミッション系のエラーがでた時、また、iphone実機にインストールする際にも権限系のエラーが出る場合。
ターゲット→ex... |
|
Tweet
|
|||
| |||