|


 Facebook#1(調査)
| 外部サイト |
|
|


HOME > UILocalNotification
UILocalNotification
UILocalNotificationでローカル通知を行います。ネットワークを介するRemoteNotificationとは違います。 iPhone端末上で時刻日付が管理され通知してくれます。
UILocalNotificationのクラス階層
NSObject
↑
UILocalNotification
参考:iOS8でUILocalNotificationの通知を受け取る
Notificationを登録する、受け取る。
	import UserNotifications

  //以下を実行してNotification実行


          //Notification登録前のおまじない。テストの為、現在のノーティフケーションを削除します
        let center = UNUserNotificationCenter.current()
        center.removeAllDeliveredNotifications();
        center.removeAllPendingNotificationRequests();

        //Notification登録前のおまじない。これがないとpermissionエラーが発生するので必要です。
        UNUserNotificationCenter.current().requestAuthorization(options: [.alert, .sound, .badge]) {
            (granted, error) in
            //Parse errors and track state
        }

        //以下で登録処理
         //https://stackoverflow.com/questions/37938771/uilocalnotification-is-deprecated-in-ios10/39529853
        let content = UNMutableNotificationContent()
        content.title = "タイトルですよ"
        content.body = "swift-saralymanからの通知だよ"
        content.sound = UNNotificationSound.default()

        let trigger = UNTimeIntervalNotificationTrigger.init(timeInterval: 5.0, repeats: false)
        let request = UNNotificationRequest.init(identifier: "FiveSecond", content: content, trigger: trigger)
        center.add(request);

    //上記のNotificatioを5秒後に受け取る関数
 	// アプリがフォアグランドの時に通知を受け取ると呼ばれる
 	import UserNotifications

    func userNotificationCenter(_ center: UNUserNotificationCenter,
                                willPresent notification: UNNotification,
                                withCompletionHandler completionHandler: @escaping (UNNotificationPresentationOptions) -> Void) {
        let userInfo = notification.request.content.userInfo
        // Print message ID.
        //print("Now Fourground. Message ID: \(userInfo["gcm.message_id"]!)")
        //print("Message ID \(userInfo["gcm.message_id"]!)")

        // Print full message.
        print("%@", userInfo)

        completionHandler([.alert, .sound])
    }
上記をAppDelegate.swftに貼り付けていただければ5秒後に以下ポップアップが表示されます
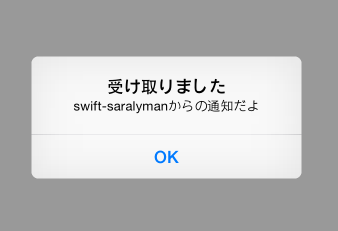
ただし、上の例はアプリがフォアグランドにいて現在使用中の場合の通知の受け取り方です。その他アプリがアクティブじゃない場合、アプリが起動自体していない場合のパターンも以下説明します
メモ:どうやらdateWithTimeIntervalSinceNowがswiftからなくなっているので代わりに以下を利用します。五秒後に実行。
[NSDate dateWithTimeIntervalSinceNow:(5)]
↓
NSDate(timeIntervalSinceNow: 5)
毎日同じ時間に通知を出す方法(毎朝8時に実行)
参考:How to schedule a same local notification in swift
参考:Create local notification and fire at certain time every day (Swift)
        let now = NSDate()
        println(now);// -> 2015-09-15 23:06:47 +0000
        let calendar = NSCalendar(identifier: NSCalendarIdentifierGregorian)
        var comps:NSDateComponents = calendar!.components(NSCalendarUnit.HourCalendarUnit|NSCalendarUnit.MinuteCalendarUnit|NSCalendarUnit.SecondCalendarUnit,fromDate: now)
        comps.calendar = calendar;
        comps.hour = 8;

        let now2 = comps.date;
        println(now2);// -> Optional(0000-12-31 22:47:48 +0000)

        var notification = UILocalNotification()
        notification.alertBody = "hogehoge"
        notification.timeZone = NSTimeZone.defaultTimeZone();
        notification.fireDate = now2;
        notification.repeatInterval = NSCalendarUnit.CalendarUnitDay;
        UIApplication.sharedApplication().scheduleLocalNotification(notification)
NSDateComponentsには必要な情報をマスクします。今回は年月日は不要なので、時間(何時何分何秒)だけを取得している例です
スケジュールをセットすると以下のログが出力されます
 Attempting to schedule a local notification {fire date = Monday, January 1, 1 at 8:09:07 AM GMT+09:18:59,
 time zone = Asia/Tokyo (GMT+9) offset 32400, repeat interval = NSCalendarUnitDay,
 repeat count = UILocalNotificationInfiniteRepeatCount,
 next fire date = Thursday, September 17, 2015 at 8:09:07 AM Japan Standard Time,
 user info = (null)} with an alert but haven't received permission from the user to display alerts
上記 haven't received permissionが表示されていると、通知許可が行われていないのでその場合はこちら(このページの下)に 記載があるのでご参照ください。
毎月同じ日の同じ時間に通知を出す方法(3日の毎朝8時に実行)
        let now = NSDate()
        println(now);// -> 2015-09-17 22:08:42 +0000
        let calendar = NSCalendar(identifier: NSCalendarIdentifierGregorian)
        var comps:NSDateComponents = calendar!.components(NSCalendarUnit.HourCalendarUnit|NSCalendarUnit.MinuteCalendarUnit|NSCalendarUnit.SecondCalendarUnit,fromDate: now)
        comps.calendar = calendar;
        comps.day = 3;
        comps.hour = 8;

        let now2 = comps.date;
        println(now2);// -> Optional(0001-01-02 22:49:43 +0000) 日本時間なので+9時間。

        var notification = UILocalNotification()
        notification.alertBody = "hogehoge"
        notification.timeZone = NSTimeZone.defaultTimeZone();
        notification.fireDate = now2;
        notification.repeatInterval = NSCalendarUnit.CalendarUnitMonth;
        UIApplication.sharedApplication().scheduleLocalNotification(notification)
Notificationを受け取る(アプリが非アクティブの場合)
アプリがバックグランドで起動している場合は以下の関数で受け取ります。
func application(application: UIApplication, handleActionWithIdentifier identifier: String?, forLocalNotification notification: UILocalNotification, completionHandler: () -> Void) {
     var alert = UIAlertView();
     alert.title = "非アクティブなのに受け取りました";
     alert.message = notification.alertBody;
     alert.addButtonWithTitle(notification.alertAction!);
     alert.show();
}
Notificationを受け取る(アプリが起動していない場合)
アプリが起動していない場合は起動時にはAppDelegate.swiftのいつものapplication:didFinishLaunchingWithOptionsが呼ばれます。 その際のオプションにLocalNotificationを経由しての起動かどうかを判別できますので、その方法で対応します。
    func application(application: UIApplication, didFinishLaunchingWithOptions launchOptions: NSDictionary!) -> Bool {
        // Override point for customization after application launch.

       //実行アプションがあるかどうか
        if let option = launchOptions {

            let notification = launchOptions?[UIApplicationLaunchOptionsLocalNotificationKey] as UILocalNotification!
            if (notification != nil) {
                //notificationを実行します
                var alert = UIAlertView();
                alert.title = "LocalNotification経由で起動しました";
                alert.show();

                //キャンセルしないと残ってしまいますのでキャンセルします
                UIApplication.sharedApplication().cancelLocalNotification(notification);
            }

        return true
    }
※2015/03/20 XCode6.3で動作しませんでしたので修正しました。
Notificationを受け取る(アプリが起動していない場合 + useInfoが含まれる場合)
アプリが起動していない場合は起動時のNotifcatoinにuserInfoが含まれている場合のサンプルがなかったので追記しました。
UILocalNotificationの場合
        var notification = UILocalNotification()
        notification.fireDate = NSDate(timeIntervalSinceNow: 15);//5秒後
        notification.timeZone = NSTimeZone.defaultTimeZone()
        notification.alertBody = "swift-saralymanからの通知だよ"
        notification.alertAction = "OK"
        notification.soundName = UILocalNotificationDefaultSoundName
        notification.userInfo = ["url":"http://swift-salaryman.com"];
例えば、上記のようにuserInfoがセットされている場合、どうやって抜き取るかを説明します。
     if let option = launchOptions {

        let notification = launchOptions?[UIApplicationLaunchOptionsLocalNotificationKey] as UILocalNotification!
        if (notification != nil) {
            if let userInfo = notification.userInfo{

                if let url = userInfo["url"] as String!{
                    var alert = UIAlertView();
                    alert.title = url;
                    alert.show();
                }
            }

            //キャンセルしないと残ってしまいますのでキャンセルします
            UIApplication.sharedApplication().cancelLocalNotification(notification);
        }

    }
RemoteNotificationの場合
 if let option = launchOptions {
            let userInfo = launchOptions[UIApplicationLaunchOptionsRemoteNotificationKey] as NSDictionary!
            if (userInfo != nil){
                if let url = userInfo["url"] as String!{
                    var alert = UIAlertView();
                    alert.title = url;
                    alert.show();
                }
            }
        }
userInfoの扱いが若干UILocalNotificationと違うので注意です。この箇所でNSUserDefaultなんかに値をいれてViewControllerでチェックする 等の処理をいれれば通常起動との分岐処理を行います。
haven't received permission from the user to display alertsのエラー
iOS8以降だとLocalnotificationの初期化が必要なので、AppDelegateに以下を追加する必要があります。 これが正常に実行されると、通知を許可しますか?のダイアログが表示されます。
 func application(application: UIApplication, didFinishLaunchingWithOptions launchOptions: [NSObject : AnyObject]?) -> Bool {
        application.registerUserNotificationSettings(UIUserNotificationSettings(forTypes: UIUserNotificationType.Sound | UIUserNotificationType.Alert | UIUserNotificationType.Badge, categories: nil))
        return true
    }
毎日同じ時間に起動する通知を作成する関数を作成しました。
毎日同じ時間に実行する通知のサンプルを以下記載しておきます。notification.repeatIntervalを調整すれば 毎月だったり毎年だったりを調整できます。
    // self.setEveryDayNotification(8,minute: 5,message: "おはようございます!");//8時5分に毎日実行されます。
    func setEveryDayNotification(hour:Int,minute:Int,message:String){

        let now = NSDate()
        let calendar = NSCalendar(identifier: NSCalendarIdentifierGregorian)
        var comps:NSDateComponents = calendar!.components(NSCalendarUnit.MinuteCalendarUnit|NSCalendarUnit.HourCalendarUnit|NSCalendarUnit.MinuteCalendarUnit|NSCalendarUnit.SecondCalendarUnit,fromDate: now)
        comps.calendar = calendar;
        comps.hour = hour;
        comps.minute = minute;

        var notification = UILocalNotification()
        notification.alertBody = message;
        notification.timeZone = NSTimeZone.defaultTimeZone();
        notification.fireDate = comps.date;
        notification.repeatInterval = NSCalendarUnit.CalendarUnitDay;//毎日
        UIApplication.sharedApplication().scheduleLocalNotification(notification)
    }
まとめ
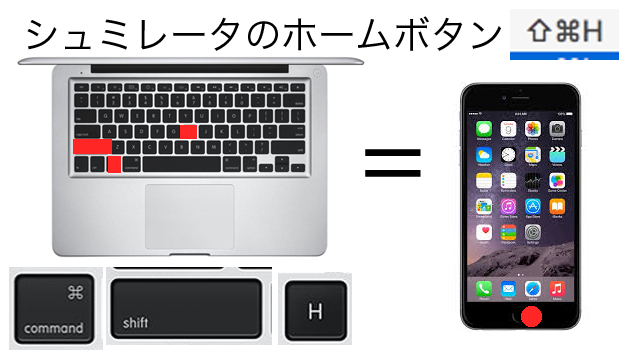
どんどん仕様が変わるので大変です!あとシュミレータのアプリを終了させる方法がわからなかったのですが、 シフト+コマンド+Hx2で終了できるようでした。知りませんでしたが、Notificationのlaunchoptionを調査するには 便利ですので使ってみてください!
↓こんな記事もありますよ!
 2021-05-14 14:21:41 | WatchOSのwatchconnectivityのFiletransferの落とし穴。と、避け方。
AppleWatch 実機だと成功するんだけど、シュミレーターだと失敗するという、、、
昔作成してた時は成功してたのになーと思って調べると、どうやら昔は成功してたみたい。watchOS6以降は... |
 2021-05-06 14:04:37 | LINEのアニメーションスタンプ制作の落とし穴、、、失敗談
ゴールデンウィークにLINEスタンプを作成してみました。
作り切って申請も通したんですが、意図したアニメーションと違う、、、、
LINEクリエーターの画面だと、アニメーションのプレビュー... |
 2021-05-01 18:05:35 | 久しぶりのAdmobをobjective-cに実装。コンパイルエラーだらけ。バーミッション不具合でエミュレータにインスコできない。
忘れないようにメモ
エミュレータにアプリをインストールする際にパーミッション系のエラーがでた時、また、iphone実機にインストールする際にも権限系のエラーが出る場合。
ターゲット→ex... |
|
Tweet
|
|||
| |||