HOME > UITabBarController
UITabBarController
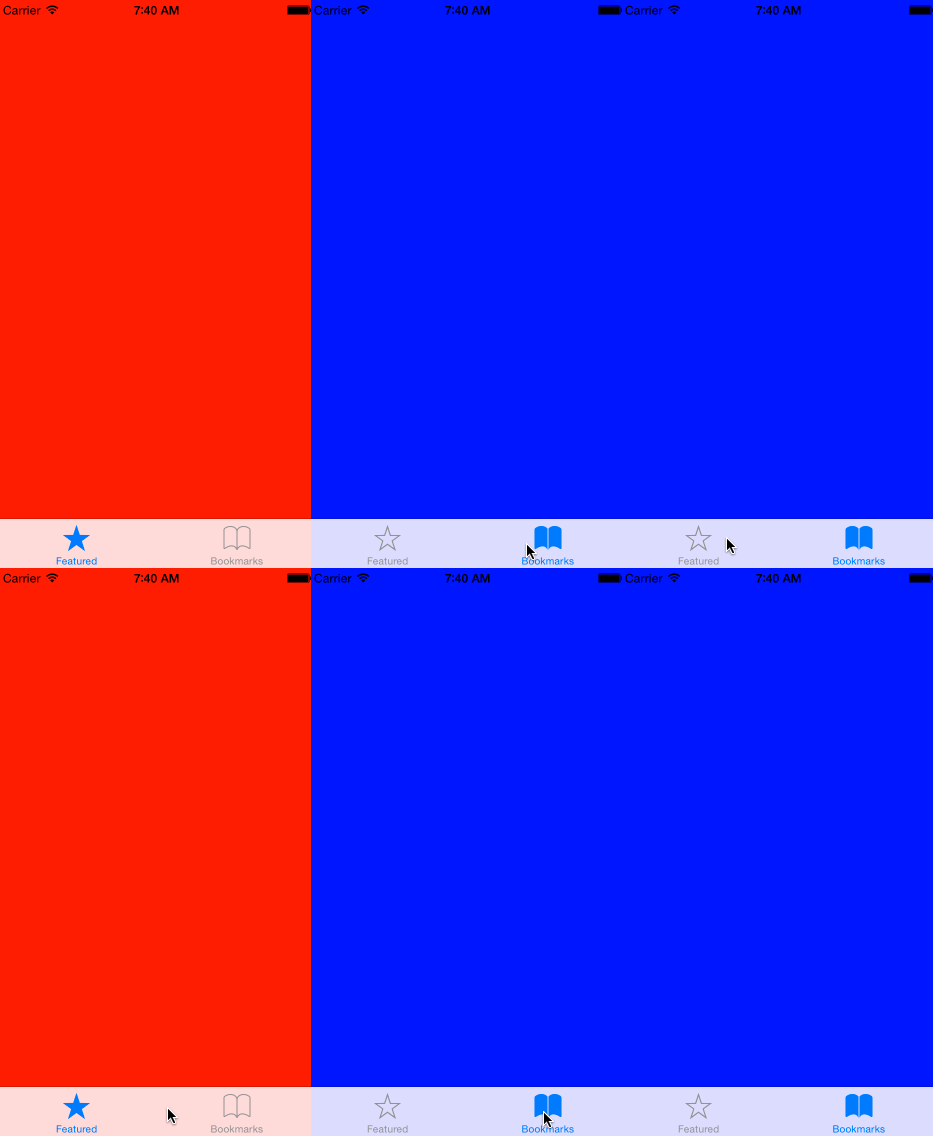
スマホ画面下にタブが出てきて画面を切り替えできるUITabBarViewControllerクラスです。UITabBarItemの記事を追加しましたがUITabbarの記事がなかったので追加しました。(※目のチカチカにご注意ください。)
UITabBarControllerのクラス階層
NSObject
↑
UIResponder
↑
UIViewController
↑
UITabBarController
参考:UIKit Framework Reference UITabBarController Class Reference
参考:013 UITabBarControllerでタブの表示
参考:[Swift] UITabBarControllerでタブ選択時のイベントを取得する
参考:swiftでUITabBarの特定のタブをタップした時にモーダル
参考:[Swift]UITabBarで画面遷移する方法
やってみた
AppDelegateでUITabBarControllerとその他のUIViewControllerを作成します。FirstViewControllerとSecondViewControllerは ほぼ同じです。背景カラーをViewOnLoadedで設定しているだけです。UITabBarContorllerの中に最初に表示されるのはFirstViewControllerになっているサンプルです。
AppDelegate
import UIKit

@UIApplicationMain
class AppDelegate: UIResponder, UIApplicationDelegate {

    private var window: UIWindow?
    private var myTabBarController: UITabBarController!

    func application(application: UIApplication, didFinishLaunchingWithOptions launchOptions: [NSObject : AnyObject]?) -> Bool {

        window = UIWindow(frame: UIScreen.mainScreen().bounds)

        //UIViewControllerをタブ数分作成してUITabViewControllerに埋め込む
        let firstView: UIViewController = FirstViewController()
        let secondView: UIViewController = SecondViewController()
        firstView.tabBarItem = UITabBarItem(tabBarSystemItem: UITabBarSystemItem.Featured, tag: 1)//アイコン
        secondView.tabBarItem = UITabBarItem(tabBarSystemItem: UITabBarSystemItem.Bookmarks, tag: 2)
        let viewArr = NSArray(objects: firstView, secondView)
        myTabBarController = UITabBarController()
        myTabBarController?.setViewControllers(viewArr as [AnyObject], animated: false)
        self.window!.rootViewController = myTabBarController

        self.window!.makeKeyAndVisible()

        return true
    }
}
FirstViewController
import UIKit

class FirstViewController: UIViewController {

    override func viewDidLoad() {
        super.viewDidLoad()
        self.view.backgroundColor = UIColor.redColor();
    }

    override func didReceiveMemoryWarning() {
        super.didReceiveMemoryWarning()
    }
}
SecondViewController
import UIKit

class SecondViewController: UIViewController {

    override func viewDidLoad() {
        super.viewDidLoad()
        self.view.backgroundColor = UIColor.blueColor()
    }

    override func didReceiveMemoryWarning() {
        super.didReceiveMemoryWarning()
    }
}
カスタマイズ
さて、UITabBarControllerのデフォルトのアイコン(UITabBarSystemItem)ですが複数あるので紹介します。
| メンバ名 | アイコン |
|---|---|
| Bookmarks |  |
| Contacts |  |
| Downloads |  |
| Favorites |  |
| Featured |  |
| History |  |
| More |  |
| MostRecent |  |
| MostViewed |  |
| Recents |  |
| Search |  |
| TopRated |  |
上記はiOS8です。iOSのバージョンが変われば変更されるのでご了承ください。
上記UITabBarSystemItemを利用する場合、タイトルを変更したい場合は結局アイコンを作成する必要があります。。。
まとめ
UITabBarSystemItemのタイトルは日本語のiOSだったら日本語になるんだったっけ。シュミレータなので確認できませんでしたorz アイコンが必要な場合はこちらの記事をご確認ください!UITabBarItemのアイコンに関して
↓こんな記事もありますよ!
 2021-05-14 14:21:41 | WatchOSのwatchconnectivityのFiletransferの落とし穴。と、避け方。
AppleWatch 実機だと成功するんだけど、シュミレーターだと失敗するという、、、
昔作成してた時は成功してたのになーと思って調べると、どうやら昔は成功してたみたい。watchOS6以降は... |
 2021-05-06 14:04:37 | LINEのアニメーションスタンプ制作の落とし穴、、、失敗談
ゴールデンウィークにLINEスタンプを作成してみました。
作り切って申請も通したんですが、意図したアニメーションと違う、、、、
LINEクリエーターの画面だと、アニメーションのプレビュー... |
 2021-05-01 18:05:35 | 久しぶりのAdmobをobjective-cに実装。コンパイルエラーだらけ。バーミッション不具合でエミュレータにインスコできない。
忘れないようにメモ
エミュレータにアプリをインストールする際にパーミッション系のエラーがでた時、また、iphone実機にインストールする際にも権限系のエラーが出る場合。
ターゲット→ex... |
|
Tweet
|
|||
| |||




 Facebook#1(調査)


